I’m always uploading files to S3 and want the public link. This little Electron / javascript app will allow drag & drop uploads, then you get a copy of the url. Hope you find it useful! Repo here: https://github.com/cbitting/S3-Electron-File-Dropper
Continue reading “Electron AWS S3 Desktop File Dropper”Cloning an AWS CloudFront Distribution Easily
I’m often creating a new site that’s similar to others and has CloudFront in front of them (yes, think WordPress). Many of these distributions have a bunch of behaviors, and I hate to waste time trying to recreate them (copying and pasting, making sure I didn’t miss a step). Anyway, finally taking a little bit of time, I’ve found it’s straightforward to do it using the AWS CLI:
Steps to export, modify, and import a new CF config file with AWS cli:
- Install the CLI if you haven’t already. It’s relatively quick and straightforward, provided you have your access and secret keys. I’ve been using Version 2 of the CLI with great success. I’m primarily on Windows, so the below steps are respective of that.
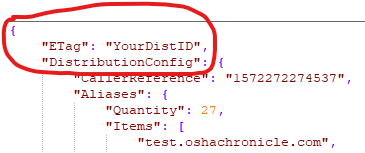
- Using the CLI, export the CloudFront config of a distribution you want to copy. In my below example, you’ll need to swap out the distribution ID with one of your real distribution IDs (something like E3xxxxxxxxxx). Also, the c:\aws folder is whatever you want.
aws2 cloudfront get-distribution-config --id YourDistID --output json > c:\aws\sourceCFconfig.json - Take this json file, sourceCFconfig.json, copy it to a new file, newCFconfig.json.
- Open the new file, edit out the first parent element (be sure to remove the last curly bracket at the end of the file as well).
- Edit the Aliases to reflect your new site info (or remove if you’re not doing HTTPS).
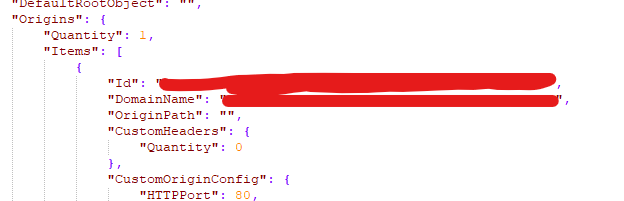
- If you’re using a different origin for this distribution, change that as well, including in the behaviors (make use of find and replace)!
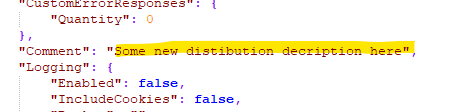
- Near the end of the doc, change the comment to something new:
- Change the ViewerCertificate to a valid certificate ARN (or remove if you’re not using HTTPS).

- Save this file you’ve been editing.
- Import this config and create a new distribution using the below command:
aws2 cloudfront create-distribution --distribution-config file://c:\aws\newCFconfig.json
If no errors are shown, you should see a new distribution in CloudFront.
How to Truncate / Trim Text By Sentence in JavaScript (not word or character)
Many times for showing a preview of longer text, I prefer not just to show a certain amount of characters (although it looks better visually) but to break it via sentence. Below is a small JavaScript function (I use it in NodeJs a bunch) that I’ve used to do this. No, it’s not the most complicated thing ever, but I wanted to share in case it helps anyone.
String.prototype.truncateBySent = function(sentCount = 3, moreText = "") {
  //match ".","!","?" - english ending sentence punctuation
  var sentences = this.match(/[^\.!\?]+[\.!\?]+/g);
  if (sentences) {
    console.log(sentences.length);
    if (sentences.length >= sentCount && sentences.length > sentCount) {
      //has enough sentences
      return sentences.slice(0, sentCount).join(" ") + moreText;
    }
  }
  //return full text if nothing else
  return this;
};
Easy to use, just do something like this:
someText.truncateBySent(2);Sometimes you also want to include something at the end to indicate there is more text, like a link or ellipsis. You can do this:
someText.truncateBySent(2,' <a href="#">View More</a>');It will take a line of text like this:
Sample sentence one? Another sentence two. Another three. Is there four? What about five? And six! Finally seven.
And return this:
Sample sentence one? Another sentence two. View More
See a working sample here: https://codepen.io/chrisbitting/pen/oNvzKNz
Or grab it on GitHub: https://github.com/cbitting/jsTruncateBySentence
Angular Pipe (or just Javascript) to Convert 24 Time to 12 Hour Format
I’m storing time in my database as 24 hour format (ie: “13:00” [1:00 PM]) because it’s easy and has a bunch of advantages. But on the front-end, in Angular, I want to show these as a 12 hour format. One way to do this is with a Pipe that will allow you to transform the time to 12 hour. Before creating the below I looking for something existing, but didn’t find anything that seemed to fit and work well, so below is what I use.
This is the function in the pipe (can be used in Javascript for those w/o Angular): (try in jsfiddle)
var time24To12 = function(a) {
    //below date doesn't matter.
    return (new Date("1955-11-05T" + a + "Z")).toLocaleTimeString("bestfit", {
        timeZone: "UTC",
        hour12: !0,
        hour: "numeric",
        minute: "numeric"
    });
};
When called and passed a time, like:
time24To12('13:00')It will return the 12 hour version:
1:00 PMOkay, so how to add a new Pipe and use it in Angular?
- Create a new file “time24to12.pipe.ts“
- File contents should be the below:
import { Pipe, PipeTransform } from '@angular/core';


@Pipe({ name: 'time24to12Transform' })
export class Time24to12Format implements PipeTransform {
  transform(time: any): any {

 var time24To12 = function(a) {
    //below date doesn't matter.
    return (new Date("1955-11-05T" + a + "Z")).toLocaleTimeString("bestfit", {
        timeZone: "UTC",
        hour12: !0,
        hour: "numeric",
        minute: "numeric"
    });
};

    return time24To12(time);
  }
}
3. Make sure in your app.module.ts you import this file:
import { Time24to12Format } from './time24to12.pipe';…and also add it to the declarations section:
@NgModule({
  declarations: [
   ...
    Time24to12Format,
 ...
4. Now you can use it in views, like below:
{{yourobject.time | convertFrom24To12Format}}Hope this helps someone. No, this code doesn’t check beforehand for correct time input formatting or perform many other things it should, it just trusts you.
AWS RDS SQL Server – Using Memory Optimized Objects in your DB
If you’re using Amazon Web Services RDS for SQL Server (btw, it works great) and want to use Memory-Optimized Objects, it’s easy to alter your DB to allow this. Below is a little T-SQL. The key to this is the directory “D:\rdsdbdata\“, the default where RDS is storing your data.
-- Add new file group

ALTER DATABASE [sampleDB] ADD FILEGROUP [MOD_FG] CONTAINS MEMORY_OPTIMIZED_DATA

GO

-- Add the new file

ALTER DATABASE [sampleDB] ADD FILE ( NAME = N'Mem_Opt_Data', FILENAME = N'D:\rdsdbdata\DATA\Mem_Opt_Data.ndf') TO FILEGROUP [MOD_FG]

GO

-- Set the MEMORY_OPTIMIZED_ELEVATE_TO_SNAPSHOT to On

ALTER DATABASE [sampleDB] SET MEMORY_OPTIMIZED_ELEVATE_TO_SNAPSHOT = ON

GO
Things that you’ll need to swap out w/ your own info is “sampleDB” and “MOD_FG”.
Now your DB is all ready for some Memory-Optimized Objects.
Want to create a table that’s memory optimized, just use this:
-- Sample table create
 CREATE TABLE testMOD (
 SomeId INT IDENTITY(1,1)
 ,FirstName VARCHAR(30) NOT NULL
 ,LastName VARCHAR(30) NOT NULL
 CONSTRAINT [PK_SomeID] PRIMARY KEY NONCLUSTERED HASH (SomeId) WITH (BUCKET_COUNT = 131072))
 WITH(MEMORY_OPTIMIZED = ON, DURABILITY = SCHEMA_AND_DATA)
 GO
These Memory-Optimized Objects do offer a significant speed improvement but don’t go crazy w/ them.
Using SQL Server for Latitude & Longitude Calculations
If you’re like me, you’ve probably stored latitude and longitude data in decimal columns for a long time. I know SQL Server has a geography type as of a few years ago, but I never really played with it much. Anyway, I finally tried it, and so far it’s great – and no individual decimal columns – and I can do calculations right in SQL.
To get started, use the geography type in a table like this?:
CREATE TABLE [dbo].[MattressStoreLocations](Continue reading “Using SQL Server for Latitude & Longitude Calculations”
[Mattress Store Name] [nvarchar](50) NULL,
[Location] [geography] NULL
) ON [PRIMARY] TEXTIMAGE_ON [PRIMARY]
Fixing WordPress Error: Maximum execution time of 30 seconds exceeded
If you have a WordPress install that is giving you this error:
Fatal error: Maximum execution time of 30 seconds exceeded in ...\wp-db.php on line ####
…It’s because PHP is timing out. The default timeout in PHP is 30 seconds, see here for details.
The fix:
The method I use for this is simple:
- Open your wp-config.php file in an editor (notepad, etc).
- Add this line to the top: set_time_limit(300);
The “300” can be any about of time (it’s seconds) you’d like.
The top of your file should like something like this:
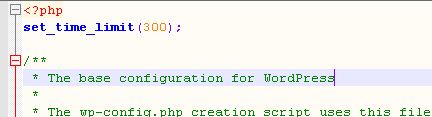
PS: You should only need to change this if you’re working on some kind of import /export or a one time process. If your blog requires this to run normally, their might be bad code or a server issue.
Getting Fortnite XBox One & PC Crossplay to Work
 Alright, so if you’re reading this, you’ve probably read some popular articles by some others (maybe major news sources) and didn’t get far. Getting Fortnite crossplay between PC & Xbox wasn’t that straightforward (at least for me), but in the end, works great. I’m trying not to do what the other articles did, and provide long, unhelpful paragraphs, so let’s get right to it. Below is what worked for me:
- I’m assuming you’re already playing Fortnite on the Xbox. You need to link your Xbox account to an Epic Games account. Do this by opening the browser (Edge) on the Xbox. Visit https://www.epicgames.com/fortnite. In the top-right, click the person icon, click Xbox.
- After clicking the Xbox button on the people menu, create a new account w/ an email address & password. (I couldn’t find an easy way to link an existing Epic account, so I just created a new one). Now you have an Epic games account linked to an Xbox live account.
- On a PC (or Mac) download the Epic Games Launcher. You can use the same PC that has a different account playing Fortnite already.
- On the PC in Epic games login to the account used to play on PC and send a friend request to the username of the Xbox user.
- Again on the PC, login into Epic games (you’ll need to logout of the PC user) and login as the Xbox account you created in step 2.
- Since you’re logged into the Xbox account (on PC) you can accept the friend request that was sent in step 4.
- You can now logout on the PC and login to a PC playing account (if you have one).
- On the Xbox, start a new party, on PC, your friends (that you accepted in step 6) can choose to play with you.
- And now win.
- Note: the first time you play w/ someone on PC via Xbox, you’ll be asked to confirm that crossplay is okay. Make sure you accept this.
Hope this helps someone out there.
Crossplay is pretty seamless, voice chat works – and now you’ve got more folks to help you win!
Increase IIS Logs to SQL Log Parser Import Performance w/ transactionRowCount
 A few years ago I showed how to use Microsoft’s Log Parser tool to take IIS log files and import into a SQL database.
From Microsoft: Log parser is a powerful, versatile tool that provides universal query access to text-based data such as log files, XML files and CSV files, as well as key data sources on the Windows® operating system such as the Event Log, the Registry, the file system, and Active Directory®. You tell Log Parser what information you need and how you want it processed. The results of your query can be custom-formatted in text based output, or they can be persisted to more specialty targets like SQL, SYSLOG, or a chart.
In short, using something like this to take IIS logs and dump into a new SQL table:
C:\Program Files (x86)\Log Parser 2.2>logparser “SELECT * INTO iisLogs FROM c:\temp\logs\*.log ” -i:iisw3c -o:SQL -server:localhost -database:webLogs -username:sa -password:yourpass -createTable: ON
But, if you’re importing tons of records, it might seem to take a while. BUT: you can use the option “transactionRowCount” to gain some performance. The transactionRowCount option determines how many rows are included in each transaction. By default, transactionRowCount is 1, so after every row, the transaction is committed. If you set it to “-1” it will include everything in 1 large transaction.
Test Results
Below a did a few tests. My test included 36,000,000 rows. Continue reading “Increase IIS Logs to SQL Log Parser Import Performance w/ transactionRowCount”
How To Create A Simple .Net Core (c#) AWS Lambda Function – Start to Finish
Creating a simple, serverless app w/ AWS Lambda is fairly easy, but some documentation out there is outdated or using the preview toolkit. Below are some steps that show how to do this today, in a few steps. I’m using Visual Studio 2017. I’m also going to assume you already have your AWS credentials on your machine, if not, that’s a different topic.
- Install the AWS Toolkit for Visual Studio 2017 for Visual Studio. This is required to give you the project templates.
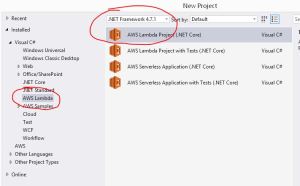
- Open Visual Studio and start a new project, choose “AWS Lambda Project” and give your project a name (I picked “awsLambdaTest”)
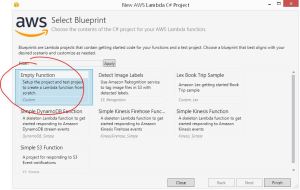
- At the Blueprint choice, choose “empty” then click “finish”.
- Your project will now create after a few seconds and should look like this:
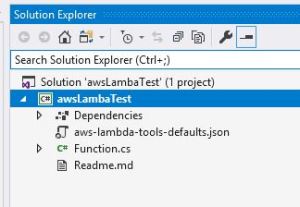
- You can edit your code (in Function.cs)
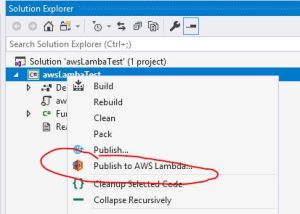
- If you don’t edit anything and publish
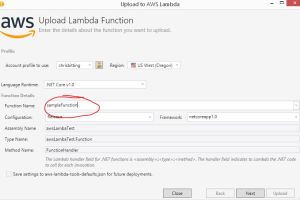
- Now give your function a name and choose “next”:
- Now choose a role, the lambda_exec role is fine, then click “upload”.
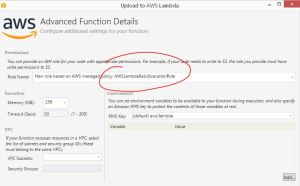
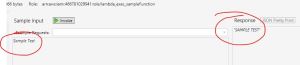
- By default, the Lambda Function view will appear – this allows you to test your function. If you enter a string in the box under “sample input” and press “invoke”, you’ll see your function response.